
Here at Gravitai, we very often get posed the question, 'What is Odoo ERP?' From small businesses to colossal global organisations, it's a tool that can provide extreme actual value and, more importantly, save you thousands across your tech stack, being an all-in-one tool to run your company.
It's one that definitely impresses your friends, that's for sure.
Did you know in a recent survey by Statista that companies in the UK spent around £3 billion each year, just alone in software, running their business? Expected to rise to £4 billion by 2024.
With the economy entirely up in the air due to rising costs and implementation prices, Odoo really hits a sweet spot in, which leaves businesses thriving. We thought it would be great to share what Odoo can actually do for your business and the benefits you can obtain as an SME or large organisation trying to cut those costs.
Find out below how Odoo can save you thousands.
So, Is Odoo Really Worth It?
Ah, the magic question. Let's get into it.
Odoo ERP is an 'Enterprise Resource Planning' software fully used company-wide for managing businesses and business processes to enforce and promote automation. Odoo, in recent years, has become a massive figure point in the ERP industry, being known as the 'SAP killer' among many.
OUR ODOO STAR SCORE, DRUM ROLL PLEASE...
Our verdict: Worth every single penny.
"The friend you never knew you actually really needed. With further increased automation, efficiency and streamlining at a small and minor cost with maximum effect across your business. You get a real bang for your buck."
- All-in-one Platform
- Low Cost Pricing
- Rise in Value & ROI
- Comprehensive Support
- Customisable
- Ease of Use
- Integration With Apps
- Paid & Free Versions
Odoo was formed in 2005 by this man below Fabien Pinckaers. A true pioneer of the ERP world. Not to mention some rather dashing Odoo trainers that he is rocking as well at the Odoo headquarters. We like your style Fabien.
[Source - rtbf.re]
The company was created in Belgium with the ultimate goal of providing businesses with a flexible and affordable ERP platform that would not rinse companies of their budgets.
Over the last 18 years, Odoo has grown to become one of the key leading management software providers, with further massive offices and partners situated all around the globe, servicing thousands of customers.
To really put it into context, Odoo now has over 7 million users worldwide, has translated into also over 30 languages, over 20,000 apps in the store, 2,000 partners globally and has been further ranked as a top ERP software by industry giants such as Gartner and Forrester.
Pretty impressive, right? We think so. Go Odoo.
"We believe that every business deserves the best software to manage their operations. We work hard every day to create a product that is powerful, flexible, and easy to use, so that our customers can actually really focus on what they do best, which is focusing on running their business."
Fabien Pinckaers - CEO at Odoo
If you want to learn more about how Odoo formed and the challenges that were faced, have a listen to the fantastic episode on the Planet Odoo Podcast. 'The Odoo Journey | ft. Fabien Pinckaers' is available on all audio platforms, such as Spotify, Amazon Music, Apple, Google Podcasts & plenty more to keep you in the mix.
Keep your eyes peeled for a friendly face appearing soon...
The open-source model of Odoo has allowed thousands of developers and key business experts to build the world's largest ecosystem of fully integrated business apps.
Today Odoo offers a range of features and solutions for businesses of all sizes and industries to take advantage of fully.
What Features Does Odoo Have?
An App for every need, that's what.
From Human Resources to building a website, Odoo offers a full suite of applications to suit all essential business needs through a mind-blowing pricing model, saving you thousands, meaning that you can maximise value and ROI.
Take a look at how you can streamline your operations.

Qualify new leads as you look to then convert them into fully qualified new customers to promote growth across your business.
Plan ahead across your workforce to manage work schedules and ensure your team is aware of your timelines.
Manage your rentals across a bespoke system to ensure that reporting is at the heart of your operations across your products.
So, how can the Odoo apps benefit your business in quick succession?
- Social & Email Marketing
- SMS Marketing
- Events & Surveys
- Website Builder
- eCommerce
- Blogs
- Forum
- Live Chat
- eLearning
- Inventory & Manufacturing
- PLM & Quality Assurance
- Discuss & Chatter
- Approvals
- IoT
- VoIP
- Knowledge
- Accounting
- Invoicing & Expenses
- Spreadsheets (BI) & Sign
- Employee Records
- Recruitment
- Time Off & Appraisals
- Fleet Management
- CRM
- Sales
- Subscriptions & Rentals
- Project
- Employee Timesheets
- Field Service
- Helpdesk
- Planning
- Appointments
Odoo features / apps, or as they do like to say, 'Modules', give each business an extensive range of choices across features. One price for all apps means you can experiment and grow without any further extra hidden costs, which can be a real big plain.
I think we can all agree that we HATE hidden costs.
Not to mention the thousands of plugins you can find on the Odoo App Store at the click of a button, which really does come in handy.
Odoo Enterprise Edition can be Cloud-hosted online, available across the globe and from any device. A massive bonus in the new digital age of working. Odoo community Edition, is only available as a desktop ERP solution. Not to mention the additional features that Enterprise gives.
It's important to also mention that with Odoo's regular platform updates, you as a business will continue to benefit from upgrades to apps at no additional cost.
We will cover the two versions in a little more depth later as we talk pricing and how to get started.
TEST ODOO FOR YOURSELF
Let us help you get started with Odoo, so you can understand how the platform matches your business requirements.
What Companies Use The Features?
Odoo is an incredibly versatile ERP system that offers a wide range of benefits for businesses in a variety of sectors.
Its robust features and flexibility make it an ideal super solution for companies of all sizes looking to further streamline their operations and improve efficiency.
It poses some wonderful opportunities for a range of sectors. Let's take a look at some of the industries massively benefiting from Odoo.
- Manufacturing
- Field Service Operations
- R&D Companies
- Training Companies
- Consultants & Odoo Partners
- Accounting Firms
- Distribution
- Retailers
- Service Companies
- Marketing Organisations
- IT Companies
- Recruitment Firms
With its flexible and customisable nature, Odoo can be tailored to meet the unique needs of businesses across a wide range of sectors. From critical inventory management and supply chain optimisation to eCommerce and marketing automation, Odoo has got you covered.
You can now say goodbye to manual errors, redundant tasks, and lost productivity. Streamline all your processes and focus on what really matters - growing your business and serving your customers.
With Odoo's bespoke customisations, your industry could benefit from the platform. Have a chat with us and see if you could save costs and boost efficiency with Odoo.
What Is Odoo.sh?
With developers in mind, Odoo.sh provides the ultimate system to host, deploy and manage their Odoo instances in the Cloud.
Development -> Staging -> Deployment
Offering a number of benefits, including high availability, scalability and automatic backups, including disaster recovery, you will be provided with a range of development and testing tools allowing your users to test their Odoo modules and applications.
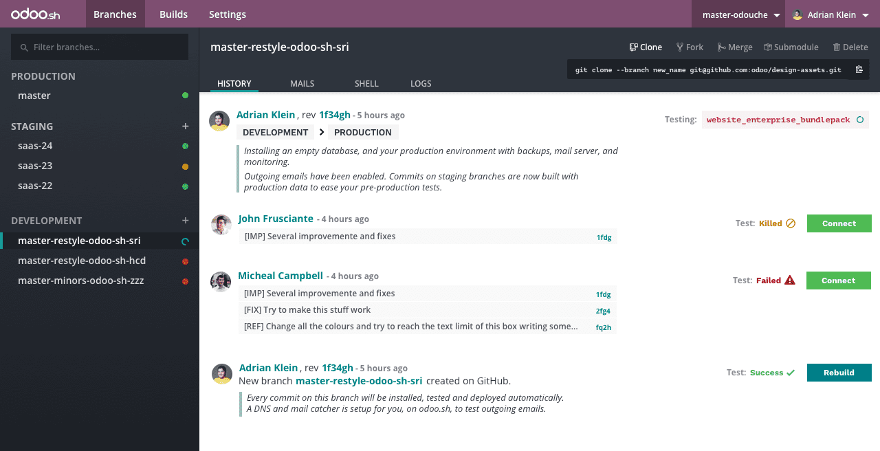
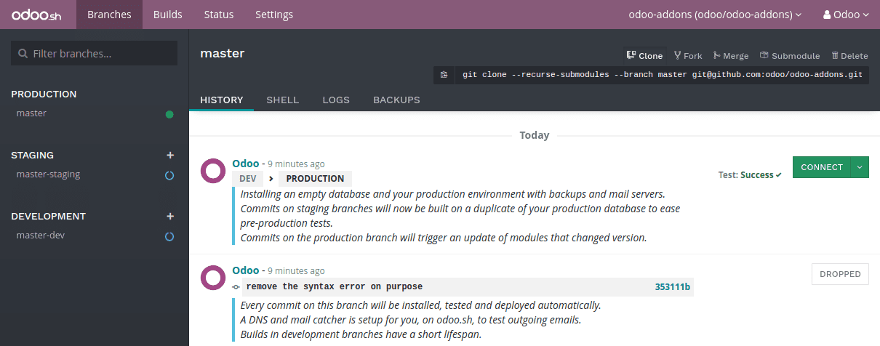
[Source - Odoo]
Let me tell you about Odoo.sh! It's like having your very own superhero sidekick for all your Odoo development needs.
With Odoo.sh, you get a fully managed platform that takes care of all the boring stuff like hosting, maintenance, and upgrades, so you can focus on unleashing your inner superhero and then further create big, amazing Odoo applications.
And that's not all! Odoo.sh comes packed with some seriously cool features, with all the development and testing tools available, your team will feel like they have superpowers! They'll be able to build and test Odoo applications with such complete ease and create multiple environments for development, testing, and production.
But wait, there is even more! Odoo.sh also includes automatic scaling, integrated GitHub, and easy collaboration between team members. It's like having a whole team of superheroes working together to make your Odoo development dreams a reality.
The New & Improved Odoo 16
Typically in Q4, every year, Odoo then releases a brand new platform version. Since Odoo 16 dropped in October 2022, the platform has seen a huge meteoric rise, due to increased functionality and a list of growing clients and users. It really is becoming the favourite.
Now Odoo 15 was fast, but Odoo 16 is a different monster.
- Opening an invoice is now 3.7x faster
- There are 2.4x less few SQL queries per URL on average
- eCommerce pages load 3.9x faster across websites in Odoo
For the past year, Odoo's critical R&D teams have massively focused on improving many existing bugs and improvements while also looking towards increased functionality across the modules.
Odoo Knowledge App
Note-taking and company documentation just become a whole lot more fun with the Odoo Knowledge app.
If you're tired of jotting down notes on boring old paper or typing up your company's documentation in a lacklustre Word doc, then have no fear, Odoo's got your back with their new 'Knowledge' app.
This app is like a personal assistant for your company's brain, allowing you to easily manage, collaborate, and share important information with your team.
Whether you're the office know-it-all or just looking to keep track of the latest company updates, the Knowledge app has got you covered.

Plus, with its sleek design and intuitive user interface, you'll feel like you're using a futuristic piece of technology straight out of a sci-fi movie. And who doesn't love feeling like they're living in the future?
Never be a knowledge hoarder, share all the wealth with your team. Check out the new knowledge app here.
Taking Odoo Accounting to The Next Level
Since partnering with KPMG, Odoo accounting has really been taken to another level, now becoming one of the best real-time accounting apps.
Over the past year, Odoo has been putting a key major focus into the accounting app, improving the navigation across the module but also now allowing accounting to then be utilised in Odoo across 70+ different countries. We know, it's incredible.
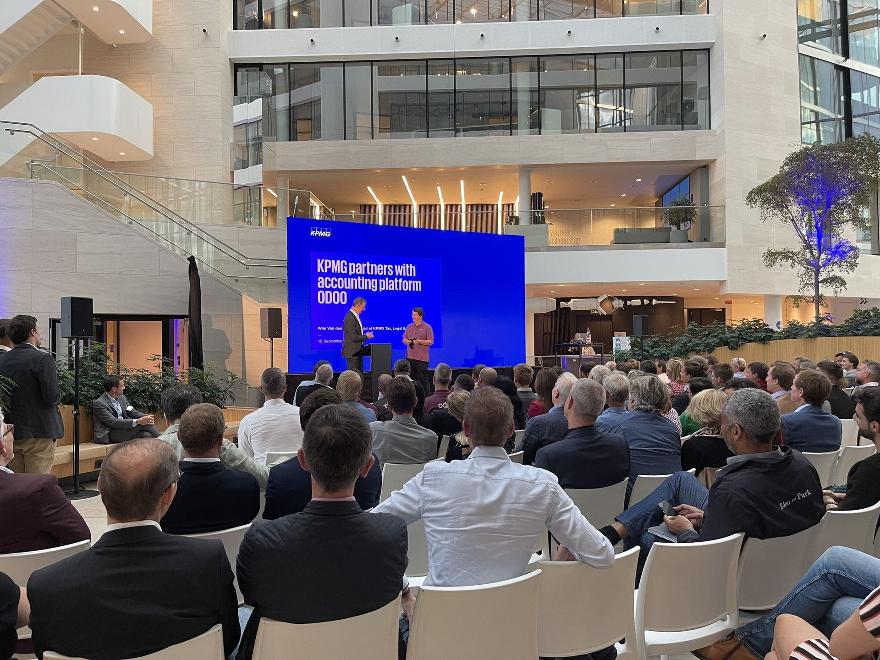
[Source - Odoo - Facebook]
With improved reporting, new analytic widgets have now been added to invoices to now ease analytic distribution, analytic plans and also distribution models. You can now break down financial reports and analyse them according to plans.
Not to mention the further improvements across credit limit warnings, recurring invoices, early payment discounts, and of course, who could forget, further accounting features being implemented.
Accounting departments have never been happier.
How Much Does Odoo Cost?
Well, you might not be shocked, but this is the question we get the most when it comes to Odoo.
Available in a brilliant SaaS subscription pricing model through the 'Enterprise' edition (Licensed) or through the FREE 'Community' version (open source ERP), both have their benefits.
Odoo currently rocks a three-plan system, payable, either monthly or yearly, depending on your system and, of course, preference.
One App
Unlimited
/ user / month
One App
Standard
€19.90
/ user / month
All Apps
Custom
€19.90
/ user / month
All Apps
With three options currently available, you enjoy all Odoo apps for a single-user price each month. Of course, it depends on how many users you will need, while also having one eye on the future but at that steal of a price, who are we to argue?

We know... An ERP, you can finally trust. Who would actually have thought it? Not us.
We do highly recommend, however, going through a partner like Gravitai when it comes to pricing. While the pricing model is straightforward, we can help advise the best plan for you and potentially also save you money when it comes to long-term plans with Odoo in mind.
All plans include unlimited support, hosting and maintenance, with no hidden costs, and no limit on features or even data. Odoo thrives on providing its customers with transparency.
So What's Included In The Odoo Subscription?
Let me break it down for you! When you subscribe to Odoo, you get access to a whole suite of amazing features that are designed to make your business run like a well-oiled machine.
First and foremost, you get direct access to hundreds of Odoo apps that cover everything from accounting and invoicing to eCommerce and marketing automation.
And the best part? They're all hosted on a scalable Cloud infrastructure that's designed to grow with your business. Plus, you don't have to worry about losing any work, as daily backups are included to keep your data safe and secure.

With your subscription, you get complete bespoke access to top-notch integration capabilities that make it super easy to connect Odoo with your existing software and systems.
Last but not least, your subscription also includes a control centre that gives you complete key control over your Odoo environment. You can manage users, install new apps, and customise your setup to meet the unique needs of your business.
How Do I Get Started With Odoo?
It's a common place that both customers and clients get stuck with. While you have all the information you need at hand, it can be a question of 'What Next?'.
We suggest a free consultation, to understand all your requirements. Something like this here.
Enlisting a partner can really propel you to ensure that you are not only getting the best deal, but you are also considering extra pricing around the Odoo implementation and possible further development of your environment.
For example, have you even considered hosting on Odoo.sh or hosing through Odoo Online? You also have to consider the development work that is needed around bespoke customisations to your business. You might need a dedicated Odoo Partner to help here.
What Is An Odoo Developer?
While we are focusing on the platform, it's a common concept that companies and businesses like to know about. Not to mention that if you choose to go down the Odoo route, then, you might come across an Odoo developer or two.
[Source - Odoo]
An Odoo developer is a particular individual that creates, builds and customises applications or features within the Odoo ERP software stack. Typically having a strong background in programming concepts as well as through the Odoo Framework, which we previously spoke about.
They work directly with Odoo apps to match project requirements that have been set.
A typical Odoo developer would be responsible for assisting in the key development of a business's Odoo ERP environment or instance. Again, every company is different when it comes to its requirements, so each developer could be tackling a different task.
They are not to be confused with consultants, however.
What Skills Does An Odoo Developer Need?
Well, if you are looking for an Odoo Developer or looking to become one, this is what we preach here at Gravitai, to ensure you are the best of the best. There are some skills you can adapt to.
Soft Skills (Recommended)
- Great Communication Skills
- Great Team Collaboration
- Sharing Ideas & Concepts
- Key Relationship Management
- Approach to Problem-Solving
Hard Skills (Recommended)
- Design & Testing of Odoo
- Business Requirement Skills
- Troubleshooting & Debugging
- Experience With Databases
- Understanding Programming
Developers may have more knowledge under their belt when it comes to the ins and outs of the instance, meaning they can tackle more complex problems if need be.
Take a look at the Odoo Developer Docs, if you would like to learn more.
Odoo Developers Working Directly With The Client
Typically Odoo developers are going to work in one of two ways, either directly with the client or under an Odoo Consultant. This depends on the complexity of the issue, requirement and timescale.
To assure responsiveness, working directly with the client, could be the best bet. This allows for a mediator not to be involved to reduce time; however, you could further run the risk of a developer missing some key functional aspects. A collapse in project management, so to speak.
We wouldn't want that, now, would we?
At Gravitai, we take a different approach to ensure that you are fitted with the best resources on the job. Through a bespoke project manager attached to your account, you have both consultants and developers on hand to ensure that your requirements are being met.

Now, if you are an Odoo resource looking to get your foot in the door, we preach three things which you should be doing to ensure that you are looking ahead to the future.
- Work For An Odoo Partner
- Learn Odoo From Scratch
- Just Go And Odoo It, Trust Us!
Practice makes perfect, after all.
Is Odoo Easy For Non-Tech Users?
One of Odoo's main aims to is to tackle those non-technical uses within your business. We have experienced it many times with clients, having to upskill a large team on a new system.
Let's face it; change is hard. Odoo, however, aims to ensure a smooth transition as best as possible.
Take it from Marc Peeters, at Sodexo.
"We replaced 14 different applications and instantly increased our revenue by 10%"
Marc Peeters - General Manager at Sodexo
[Source - Odoo]
Odoo aims to provide painless integrations.
Often in lots of companies, we find software solutions that don't work or multiple software solutions that don't work together in businesses. Communication is essential in this day and age. Businesses need a comprehensive view of what's going on to ensure that they are not burning costs.
All this in a single cost-effective solution, with apps integrated so you can enjoy savings and reap the benefits.
Don't believe us? Take a closer look at some of the Odoo customer testimonials!
How Do You Implement Odoo?
A fantastic question.
If you are still wanting to learn more about Odoo, we suggest getting started with Odoo's slides across their learning portal; you can find here, to learn more.
Knowledge is a SUPER power!
We recommend 'Getting Started', allowing you to get to grips with the basics of Odoo. A fair warning, however, that once you start, you won't be able to stop. It's addictive! You can alternatively check out Odoo Videos, if you want some more visualisation beforehand.
Be warned! If you are truly wanting to utilise Odoo for its full capabilities, then you will need to apply yourself. While it is not a complex platform to understand, the much more adopted you become, the more rewards you and your business will reap
While we are massive advocates of our clients being proactive and wanting to truly adopt Odoo, it's always good to have an Odoo Partner on your side to guide you through the costs and ensure that you are hitting your ROI and value through Odoo.